Tag: Linux

  • ๐Ÿ“‚

    Homelab initial setup

    I have gone with Ubuntu Server 22.04 LTS for my Homelab’s operating system.

    Most of the videos I’ve seen for Homelab-related guides and reviews tend to revolve around Proxmox and/or TrueNAS. I have no experience with either of those, but I do have experience with Docker, so I am opting to go with straight up docker — at least for now.

    Setting up the Operating system

    I’m using a Linux-based system and so instructions are based on this.

    Step 1: Download the Ubuntu Server iso image

    Head here to download your preferred version of Ubuntu Server. I chose the latest LTS version at the time of writing (22.04)

    Step 2: Create a bootable USB stick with the iso image you downloaded.

    Once downloaded, insert and a usb stick to install the Ubuntu Server iso on to.

    Firstly, check where your USB stick is on your filesystem. For that, I use fdisk:

    Bash
    sudo fdisk -l

    Assuming the USB stick is located at “/dev/sdb“, I use the dd command to create my bootable USB (please check and double check where your USB is mounted on your system):

    Bash
    sudo dd bs=4M if=/path/to/Ubuntu-Server-22-04.iso of=/dev/sdb status=progress oflag=sync

    Step 3: Insert and boot to the bootable USB stick into the Homelab computer

    Boot the computer that you’re using for your server, using the USB stick as a temporary boot device.

    Step 4: Install the operating system

    Follow the steps that the set up guide gives you.

    As an aside, I set my server ssd drive up with the “LVM” option. This has helped immensely this week, as I have added a second drive and doubled my capacity to 440GB.

    Step 5: install and enable ssh remote access

    I can’t remember if ssh came installed or enabled, but you can install openssh and then enable the sshd service.

    You can then connect to the server from a device on your network with:

    Bash
    ssh username@192.168.0.77

    This assumes your server’s IP address is 192.168.0.77. Chances are very high it’ll be a different number (although the 192.168.0 section may be correct.

    Everything else done remotely

    I have an external keyboard in case I ever need to plug in to my server. However, now I have ssh enabled, I tend to just connect from my laptop using the ssh command show just above.


  • ๐Ÿ“‚ ,

    Setting up mine, and my family’s, Homelab

    I’ve opted for what I believe is the easiest, and cheapest, method of setting up my Homelab.

    I’m using my old work PC which has the following spec:

    • Quad core processor — i7, I think.
    • 16gb of RAM
    • 440GB ssd storage (2x 220gb in an LVM setup)
    • A USB plug-in network adapter (really want to upgrade to an internal one though)

    My Homelab Goals

    My homelab goals are centered around two fundamental tenets: lower cost for online services and privacy.

    I want to be:

    • Hosting my own personal media backups: All my personal photos and videos I want stored in my own installation of Nextcloud. Along with those I want to also utilize its organizational apps too: calendar; todos; project planning; contacts.
    • Hosting my own music collection: despite hating everything Google stands for, I do enjoy using its Youtube Music service. However, I have many CDs (yes, CDs) in the loft and don’t like the idea of essentially renting access to music. Plus it would be nice to streaming music to offline smart speakers (i.e. not Alexa; Google Speaker; et al.)
    • Hosting old DVD films: I have lots of DVDs in the loft and would like to be able to watch them (without having to buy a new DVD player)
    • Learning more about networking: configuring my own network is enjoyable to me and is something I want to increase my knowledge in. Hosting my own services for my family and myself is a great way to do this.
    • Teach my Son how to own and control his own digital identity (he’s 7 months old): I want my Son to be armed with the knowledge of modern day digital existence and the privacy nightmares that engulf 95% of the web. And I want Him to have the knowledge and ability to be able to control his own data and identity, should He wish to when he’s older.

    Documenting my journey

    I will be documenting my Homelab journey as best as I can, and will tag all of these posts with the category of Homelab.


  • ๐Ÿ“‚

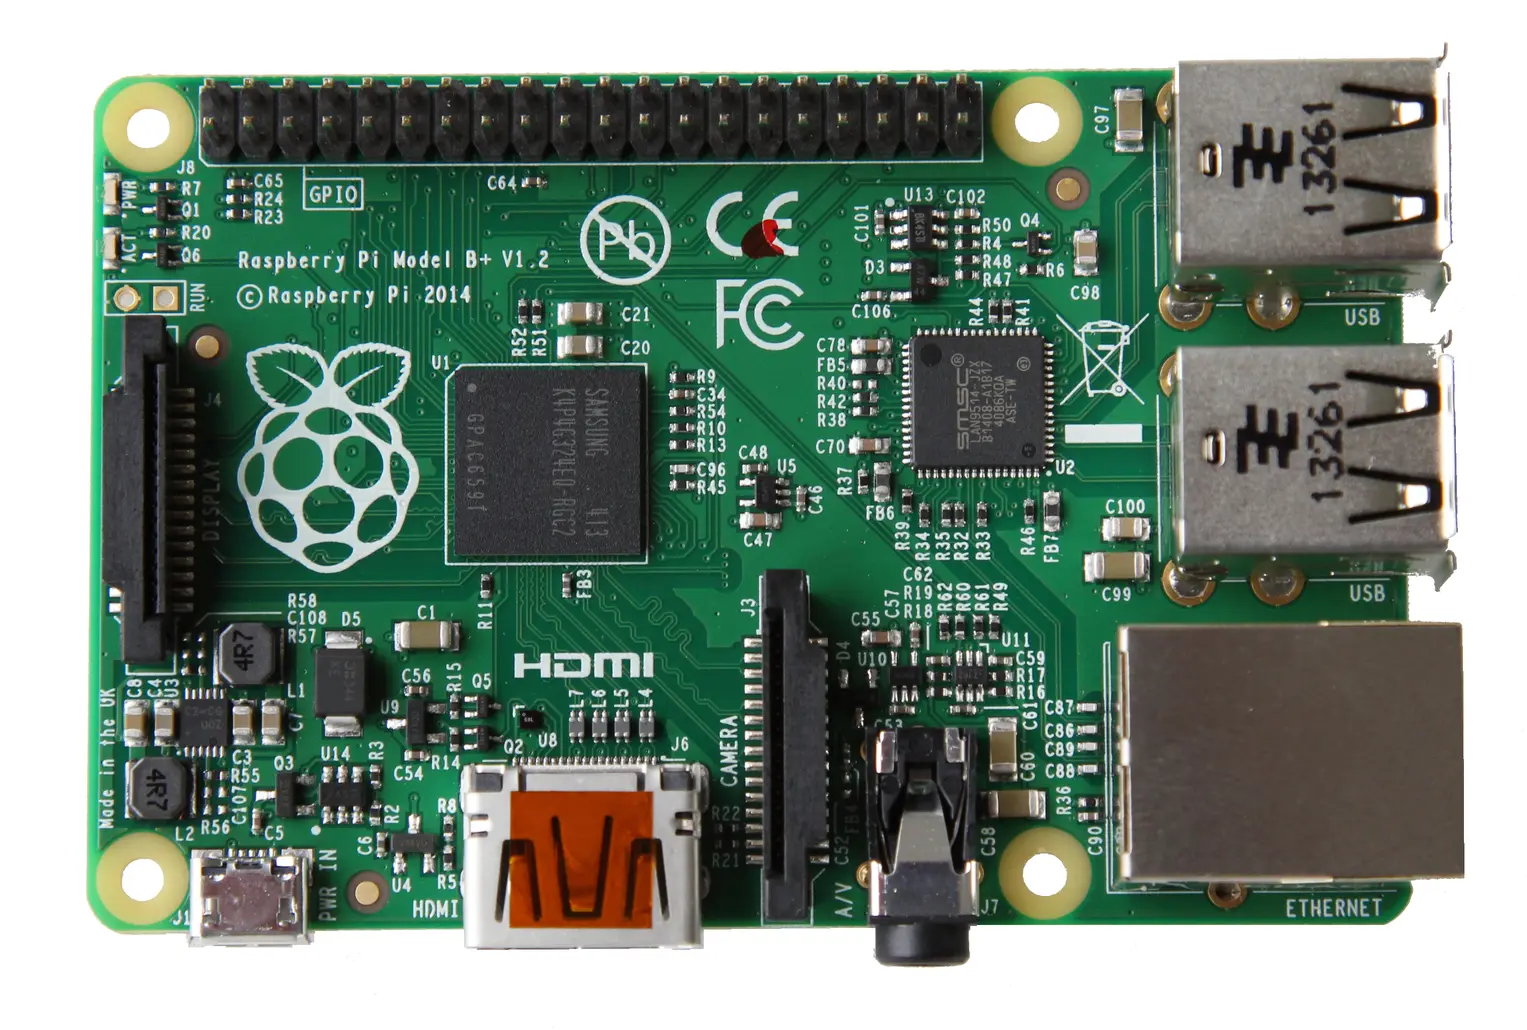
    I’m now running pi-hole through my Raspberry Pi 2b.

    It’s both amazing and depressing just how many trackers are being blocked by it. I even noticed a regular ping being made to an Amazon endpoint exactly every 10 minutes.

    I will try and write up my set up soon, which is a mix of setting up the Raspberry Pi and configuring my home router.


    I’ve also managed to finally get a home server running again – using Ubuntu Server LTS.

    My plan on my server is to just install services I want to self-host using docker. Docker being the only program I’ve installed on the machine itself.

    So far I have installed the following:

    • Home Assistant — On initial playing with this I have decided that it’s incredible. Connected to my LG TV and lets me control it from the app / laptop.
    • Portainer — A graphical way to interact with my docker containers on the server.

  • ๐Ÿ“‚ ,

    I have decided to get back into tinkering with my Raspberry Pi.

    I will be blogging my journey as I stumble through my initial playing, through to building out my first proper homelab.

    This first Raspberry Pi (model 2b) will be initially used as both a wireguard VPN server and a local DNS server.


  • ๐Ÿ“‚

    Beyond Aliases — define your development workflow with custom bash scripts

    Being a Linux user for just over 10 years now, I can’t imagine my life with my aliases.

    Aliases help with removing the repetition of commonly-used commands on a system.

    For example, here’s some of my own that I use with the Laravel framework:

    Bash
    alias a="php artisan"
    alias sail='[ -f sail ] && bash sail || bash vendor/bin/sail'
    alias stan="./vendor/bin/phpstan analyse"

    You can set these in your ~/.bashrc file. See mine in my dotfiles as a fuller example.

    However, I recently came to want greater control over my development workflow. And so, with the help of videos by rwxrob, I came to embrace the idea of learning bash, and writing my own little scripts to help in various places in my workflow.

    A custom bash script

    For the example here, I’ll use the action of wanting to “exec” on to a local docker container.

    Sometimes you’ll want to get into a shell within a local docker container to test / debug things.

    I found I was repeating the same steps to do this and so I made a little script.

    Here is the script in full:

    Bash
    #!/bin/bash
    
    docker container ls | fzf | awk '{print $1}' | xargs -o -I % docker exec -it % bash

    Breaking it down

    In order to better understand this script I’ll assume no prior knowledge and explain some bash concepts along the way.

    Sh-bang line.

    the first line is the “sh-bang”. It basically tells your shell which binary should execute this script when ran.

    For example you could write a valid php script and add #!/usr/bin/php at the top, which would tell the shell to use your php binary to interpret the script.

    So #!/usr/bash means we are writing a bash script.

    Pipes

    The pipe symbol: |.

    In brief, a “pipe” in bash is a way to pass the output of the left hand command to the input of the right hand command.

    So the order of the commands to be ran in the script is in this order:

    1. docker container ls
    2. fzf
    3. awk ‘{print $1}’
    4. xargs -o -I % docker exec -it % bash

    docker container ls

    This gives us the list of currently-running containers on our system. The output is the list like so (I’ve used an image as the formatting gets messed up when pasting into a post as text) :

    fzf

    So the output of the docker container ls command above is the table in the image above, which is several rows of text.

    fzf is a “fuzzy finder” tool, which can be passed a list of pretty much anything, which can then be searched over by “fuzzy searching” the list.

    In this case the list is each row of that output (header row included)

    When you select (press enter) on your chosen row, that row of text is returned as the output of the command.

    In this image example you can see I’ve typed in “app” to search for, and it has highlighted the closest matching row.

    awk ‘{print $1}’

    awk is an extremely powerful tool, built into linux distributions, that allows you to parse structured text and return specific parts of that text.

    '{print $1}' is saying “take whatever input I’m given, split it up based on a delimeter, and return the item that is 1st ($1).

    The default delimeter is a space. So looking at that previous image example, the first piece of text in the docker image rows is the image ID: `”df96280be3ad” in the app image chosen just above.

    So pressing enter for that row from fzf, wil pass it to awk, which will then split that row up by spaces and return you the first element from that internal array of text items.

    xargs -o -I % docker exec -it % bash

    xargs is another powerful tool, which enables you to pass what ever is given as input, into another command. I’ll break it down further to explain the flow:

    The beginning of the xargs command is as so:

    Bash
    xargs -o -I %

    -o is needed when running an “interactive application”. Since our goal is to “exec” on to the docker container we choose, interactive is what we need. -o means to “open stdin (standard in) as /dev/tty in the child process before executing the command we specify.

    Next, -I % is us telling xargs, “when you next see the ‘%’ character, replace it with what we give you as input. Which in this case will be that docker container ID returned from the awk command previously.

    So when you replace the % character in the command that we are giving xargs, it will read as such:

    Bash
    docker exec -it df96280be3ad bash

    This is will “exec” on to that docker container and immediately run “bash” in that container.

    Goal complete.

    Put it in a script file

    So all that’s needed now, is to have that full set of piped commands in an executable script:

    Bash
    #!/bin/bash
    
    docker container ls | fzf | awk '{print $1}' | xargs -o -I % docker exec -it % bash

    My own version of this script is in a file called d8exec, which after saving it I ran:

    Bash
    chmod +x ./d8exec

    Call the script

    In order to be able to call your script from anywhere in your terminal, you just need to add the script to a directory that is in your $PATH. I keep mine at ~/.local/bin/, which is pretty standard for a user’s own scripts in Linux.

    You can see how I set my own in my .bashrc file here. The section that reads $HOME/.local/bin is the relevant piece. Each folder that is added to the $PATH is separated by the : character.

    Feel free to explore further

    You can look over all of my own little scripts in my bin folder for more inspiration for your own bash adventures.

    Have fun. And don’t put anything into your scripts that you wouldn’t want others seeing (api keys / secrets etc)


  • ๐Ÿ“‚

    Setting up a GPG Key with git to sign your commits

    Signing your git commits with GPG is really easy to set up and I’m always surprised by how many developers I meet that don’t do this.

    Of course it’s not required to push commits and has no baring on quality of code. But that green verified message next to your commits does feel good.

    Essentially there are three parts to this:

    1. Create your GPG key
    2. Tell git to use your GPG key to sign your commits
    3. Upload the public part of your GPG key to Gitlab / Github / etc

    Creating the GPG key if needed

    gpg --full-generate-key
    

    In the interactive guide, I choose:

    1. (1) RSA and RSA (default)
    2. 4096 bits long
    3. Does not expire
    4. Fill in Name, Email, Comment and Confirm.
    5. Enter passphrase when prompted.

    Getting the Key ID

    This will list all of your keys:

    gpg --list-secret-keys --keyid-format=long
    

    Example of the output:

    sec   rsa4096/THIS0IS0YOUR0KEY0ID 2020-12-25 [SC]
          KGHJ64GHG6HJGH5J4G6H5465HJGHJGHJG56HJ5GY
    uid                 [ultimate] Bob GPG Key<mail@your-domain.co.uk>
    

    In that example, the key id that you would need next is “THIS0IS0YOUR0KEY0ID” from the first line, after the forward slash.

    Tell your local git about the signing key

    To set the gpg key as the signing key for all of your git projects, run the following global git command:

    git config --global user.signingkey THIS0IS0YOUR0KEY0ID
    

    If you want to do it on a repository by repository basis, you can run it from within each project, and omit the --global flag:

    git config user.signingkey THIS0IS0YOUR0KEY0ID
    

    Signing your commits

    You can either set commit signing to true for all projects as the default, or by a repo by repo basis.

    # global
    git config --global commit.gpgsign true
    
    # local
    git config commit.gpgsign true
    

    If you wanted to, you could even decide to sign commits per each commit, by not setting it as a config setting, but passing a flag on every commit:

    git commit -S -m "My signed commit message"
    

    Adding your public key to gitlab / github / wherever

    Firstly export the public part of your key using your key id. Again, using the example key id from above:

    # Show your public key in terminal
    gpg --armor --export THIS0IS0YOUR0KEY0ID
    
    # Copy straight to your system clipboard using "xclip"
    gpg --armor --export THIS0IS0YOUR0KEY0ID | xclip -sel clipboard
    

    This will spit out a large key text block begining and ending with comments. Copy all of the text that it gives you and paste it into the gpg textbox in your git forge of choice – gitlab / github / gitea / etc.


  • ๐Ÿ“‚ ,

    Connecting to a VPN in Arch Linux with nmcli

    nmcli is the command line tool for interacting with NetworkManager.

    For work I sometimes need to connect to a vpn using an .ovpn (openvpn) file.

    This method should work for other vpn types (I’ve only used openvpn)

    Installing the tools

    All three of the required programs are available via the official Arch repositories.

    Importing the ovpn file into your Network Manager

    Once you’ve got the openvpn file on your computer, you can import it into your Network Manager configuration with the following command:

    # Replace the file path with your own correct one.
    nmcli connection import type openvpn file /path/to/your-file.ovpn

    You should see a message saying that the connection was succesfully added.

    Activate the connection

    Activating the connection will connect you to the VPN specified with that .ovpn file.

    nmcli connection up your-file

    If you need to provide a password to your vpn connection, you can add the --ask flag, which will make the connection up command ask you for a password:

    nmcli connection up your-file --ask

    Disconnect

    To disconnect from the VPN, just run the down command as follows:

    nmcli connection down you-file

    Other Links:

    Network Manager on the Arch Wiki.


  • ๐Ÿ“‚ ,

    Installing and setting up github cli

    What is the github cli

    The Github CLI tool is the official Github terminal tool for interacting with your github account, as well as any open source projects hosted on Github.

    I’ve only just begun looking into it but am already trying to make it part of my personal development flow.

    Installation

    You can see the installation instructions here, or if you’re running on Arch Linux, just run this:

    sudo pacman -S github-cli

    Once installed, you should be able to run the following command and see the version you have installed:

    gh --version

    Authenticating

    Before interacting with your github account, you will need to login via the cli tool.

    Generate a Github Personal Access Token

    Firstly, I generate a personal access token on the Github website. In my settings page I head to “Developer Settings” > “Personal Access Tokens” > “Tokens (classic)”.

    I then create a new “classic” token (just my preference) and I select all permissions and give it an appropriate name.

    Then I create it and keep the page open where it displays the access token. This is for pasting it into the terminal during the authentication flow next.

    Go through the Github CLI authentication flow

    Start the authentication flow by running the command:

    gh auth login

    The following highlights are the options I select when going through the login flow. Your needs may vary.

    What account do you want to log into?
    > Github.com
    > Github Enterprise Server
    
    What is your preferred protocol for Git operations?
    > HTTPS
    > SSH
    
    Upload your SSH public key to your Github account?
    > /path/to/.ssh/id_rsa.pub
    > Skip
    
    How would you like to authenticate Github CLI?
    > Login with a web browser
    > Paste an authentication token

    I then paste in the access token from the still-open tokens page, and hit enter.

    You should see it correctly authenticates you and displays who you are logged in as.

    Check out the official documentation to see all of the available actions you can perform on your account.


  • ๐Ÿ“‚ ,

    Starting a new Laravel 9 project

    Whenever I start a new Laravel project, whether that’s a little side-project idea or just having a play, I try to follow the same process.

    I recently read Steve’s post here on starting your first Laravel 9 Application, so thought I would write down my own setup.

    Whereas Steve’s guide walks you through the beginnings of building a new app, I’m only going to show what I do to get a new project in a ready state I’m happy with before beginning a build.

    This includes initial setup, static analysis, xdebug setup and CI pipeline setup (with Github Actions).


    Pre-requisites

    Before starting, I already have docker and docker-compose installed for my system (Arch Linux BTW).

    Oh and curl is installed, which is used for pulling the project down in the initial setup.

    Other than that, everything that is needed is contained within the Docker containers.

    I then use Laravel’s quick setup from their documentation.


    Initial setup

    Using Laravel’s magic endpoint here, we can get a new Laravel project setup with docker-compose support right out of the box. This could take a little time — especially the first time your run it, as it downloads all of the docker images needed for the local setup.

    curl -s https://laravel.build/my-new-site | bash

    At the end of the installation, it will ask you your password in order to finalise the last steps.

    Once finished, you should be able to start up your new local project with the following command:

    cd my-new-site
    
    ./vendor/bin/sail up -d

    If you now direct your browser to http://localhost , you should see the default Laravel landing page.


    Code style fixing with Laravel Pint

    Keeping a consistant coding style across a project is one of the most important aspects of development — especially within teams.

    Pint is Laravel’s in-house development library to enable the fixing of any deviations from a given style guide, and is actually included as a dev dependancy in new Laravel projects.

    Whether you accept it’s opinionated defaults or define your own rules in a “pint.json” file in the root of your project, is up to you.

    In order to run it, you simply run the following command:

    ./vendor/bin/sail bin pint

    A fresh installation of Laravel should give you no issues whatsoever.

    I advise you to make running this command often — especially before making new commits to your version control.


    Static Analysis with Larastan

    Static analysis is a great method for testing your code for things that would perhaps end up as run time errors in your code later down the line.

    It analyses your code without executing it, and warns of any bugs and breakages it finds. It’s clever stuff.

    Install Larastan with the following command:

    ./vendor/bin/sail composer require nunomaduro/larastan:^2.0 --dev

    Create a file called “phpstan.neon” in the root of your project with the following contents:

    includes:
        - ./vendor/nunomaduro/larastan/extension.neon
    
    parameters:
    
        paths:
            - app/
    
        # Level 9 is the highest level
        level: 5
    

    Then run the analyser with the following command:

    ./vendor/bin/sail bin phpstan analyse

    You can actually set the level in your phpstan.neon file to 9 and it will pass in a fresh Laravel application.

    The challenge is to keep it passing at level 9.


    Line by Line debugging with Xdebug

    At the time of writing, xdebug does come installed with the Laravel sail dockerfiles. However, the setup does need an extra step to make it work fully (at least in my experience)

    Aside:

    There are two parts to xdebug to think about and set up.

    Firstly is the server configuration — this is the installation of xdebug on the php server and setting the correct configuration in the xdebug.ini file.

    The second part is setting up your IDE / PDE to accept the messages that xdebug is sending from the server in order to display the debugging information in a meaningful way.

    I will show here what is needed to get the server correctly set up. However, you will need to look into how your chosen editor works to receive xdebug messages. VS Code has a plugin that is apparently easy to setup for this.

    I use Neovim, and will be sharing a guide soon for how to get debugging with xdebug working in Neovim soon.

    Enable Xdebug in Laravel Sail

    In order to “turn on” xdebug in Laravel Sail, we just need to enable it by way of an environment variable in the .env file.

    Inside your project’s .env file, put the following:

    SAIL_XDEBUG_MODE=develop,debug

    Unfortunately, in my own experience this hasn’t been enough to have xdebug working in my editor (Neovim). And looking around Stack Overflow et. al, I’m not the only one.

    However, what follows is how I get the xdebug server correctly configured for me to debug in Neovim. You will need to take an extra step or two for your editor of choice in order to receive those xdebug messages and have them displayed for you.

    Publish the Sail runtime files

    One thing Laravel does really well, is creating sensible defaults with the ease of overriding those defaults — and Sail is no different.

    Firstly, publish the Laravel sail files to your project root with the following command:

    ./vendor/bin/sail artisan sail:publish

    Create an xdebug ini file

    After publishing the sail stuff above, you will have a folder in the root of your project called “docker”. Within that folder you will have different folders for each of the supported PHP versions.

    I like to use the latest version, so I would create my xdebug ini file in the ./docker/8.2/ directory, at the time of writing.

    I name my file ext-xdebug.ini, and add the following contents to it. You may need extra lines added depending on your IDE’s setup requirements too.

    [xdebug]
    xdebug.start_with_request=yes
    xdebug.discover_client_host=true
    xdebug.max_nesting_level=256
    xdebug.client_port=9003
    xdebug.mode=debug
    xdebug.client_host=host.docker.internal

    Add a Dockerfile step to use the new xdebug ini file

    Within the Dockerfile located at ./docker/8.2/Dockerfile, find the lines near the bottom of the file that are copying files from the project into the container, and add another copy line below them as follows:

    COPY start-container /usr/local/bin/start-container
    COPY supervisord.conf /etc/supervisor/conf.d/supervisord.conf
    COPY php.ini /etc/php/8.2/cli/conf.d/99-sail.ini
    COPY ext-xdebug.ini /etc/php/8.2/cli/conf.d/ext-xdebug.ini

    Optionally rename the docker image

    It is recommended that you rename the image name within your project’s ./docker-compose.yml file, towards the top:

    laravel.test:
        build:
            context: ./docker/8.2
            dockerfile: Dockerfile
            args:
                WWWGROUP: '${WWWGROUP}'
        image: sail-8.2/app
        image: renamed-sail-8.2/app

    This is only if you have multiple Laravel projects using sail, as the default name will clash between projects.

    Rebuild the Image.

    Now we need to rebuild the image in order to get our new xdebug configuration file into our container.

    From the root of your project, run the following command to rebuild the container without using the existing cache.

    ./vendor/bin/sail build --no-cache

    Then bring the containers up again:

    ./vendor/bin/sail up -d

    Continuous Integration with Github Actions

    I use Github for storing a backup of my projects.

    I have recently started using Github’s actions to run a workflow for testing my code when I push it to the repository.

    In that workflow it first installs the code and it’s dependancies. It then creates an artifact tar file of that working codebase and uses it for the three subsequent workflows I run after, in parallel: Pint code fixing; Larastan Static Analysis and Feature & Unit Tests.

    The full ci workflow file I use is stored as a Github Gist. Copy the contents of that file into a file located in a ./.github/workflows/ directory. You can name the file itself whatever you’d like. A convention is to name it “ci.yml”.

    The Github Action yaml explained

    When to run the action

    Firstly I only want the workflow to run when pushing to any branch and when creating pull requests into the “main” branch.

    on:
      push:
        branches: [ "*" ]
      pull_request:
        branches: [ "main" ]

    Setting up the code to be used in multiple CI checks.

    I like to get the codebase into a testable state and reuse that state for all of my tests / checks.

    This enables me to not only keep each CI step separated from the others, but also means I can run them in parallel.

    setup:
        name: Setting up CI environment
        runs-on: ubuntu-latest
        steps:
        - uses: shivammathur/setup-php@15c43e89cdef867065b0213be354c2841860869e
          with:
            php-version: '8.1'
        - uses: actions/checkout@v3
        - name: Copy .env
          run: php -r "file_exists('.env') || copy('.env.example', '.env');"
        - name: Install Dependencies
          run: composer install -q --no-ansi --no-interaction --no-scripts --no-progress --prefer-dist
        - name: Generate key
          run: php artisan key:generate
        - name: Directory Permissions
          run: chmod -R 777 storage bootstrap/cache
        - name: Tar it up 
          run: tar -cvf setup.tar ./
        - name: Upload setup artifact
          uses: actions/upload-artifact@v3
          with:
            name: setup-artifact
            path: setup.tar
    

    This step creates an artifact tar file from the project that has been setup and had its dependancies installed.

    That tar file will then be called upon in the three following CI steps, extracted and used for each test / check.

    Running the CI steps in parallel

    Each of the CI steps I have defined — “pint”, “larastan” and “test-suite” — all require the “setup” step to have completed before running.

    pint:
        name: Pint Check
        runs-on: ubuntu-latest
        needs: setup
        steps:
        - name: Download Setup Artifact
          uses: actions/download-artifact@v3
          with:
            name: setup-artifact
        - name: Extraction
          run: tar -xvf setup.tar
        - name: Running Pint
          run: ./vendor/bin/pint

    This is because they all use the artifact that is created in that setup step. The artifact being the codebase with all dependancies in a testable state, ready to be extracted in each of the CI steps.

    pint:
        name: Pint Check
        runs-on: ubuntu-latest
        needs: setup
        steps:
        - name: Download Setup Artifact
          uses: actions/download-artifact@v3
          with:
            name: setup-artifact
        - name: Extraction
          run: tar -xvf setup.tar
        - name: Running Pint
          run: ./vendor/bin/pint

    Those three steps will be run in parallel as a default; there’s nothing we need to do there.

    Using the example gist file as is, should result in a full passing suite.


    Further Steps

    That is the end of my starting a new Laravel project from fresh, but there are other steps that will inevitably come later on — not least the Continuous Delivery (deployment) of the application when the time arrises.

    You could leverage the excellent Laravel Forge for your deployments — and I would actually recommend this approach.

    However, I do have a weird interest in Kubernetes at the moment and so will be putting together a tutorial for deploying your Laravel Application to Kubernetes in Digital Ocean. Keep an eye out for that guide — I will advertise that post on my Twitter page when it goes live.


  • ๐Ÿ“‚

    The Arch Wiki really is an incredible resource, regardless of what distro you’re running. Just got my video drivers setup correctly (I think) by just following the guide and the pages it took me to. #RTFM