Programming
-
What the hell was I thinking
“What the hell was I thinking?”; “Huh?”; “Who’s the fucking idiot who did this?.. oh. It was me…”. Three questions every developer / coder / programmer / whatever-er asks themselves from time to time. And I am definitely no different. I built an initial version of a web-based tool for work some time ago. I…
-
I have decided to get back into tinkering with my Raspberry Pi. I will be blogging my journey as I stumble through my initial playing, through to building out my first proper homelab. This first Raspberry Pi (model 2b) will be initially used as both a wireguard VPN server and a local DNS server.
-
Installing and setting up github cli
What is the github cli The Github CLI tool is the official Github terminal tool for interacting with your github account, as well as any open source projects hosted on Github. I’ve only just begun looking into it but am already trying to make it part of my personal development flow. Installation You can see…
-
How I organize my Neovim configuration
The entry point for my Neovim Configuration is the init.lua file. Init.lua My entrypoint file simply requires three other files: The user.plugins file is where I’m using Packer to require plugins for my configuration. I will be writing other posts around some of the plugins I use soon. The user.options file is where I set…
-
Started working on a side project I’m calling “Pitch”. It’s an end to end encrypted website starter inspired by SiteJS by the Small Technology Foundation. Got a basic vue app set up with the vue-cli but now can’t work out why my private key generator sometimes returns what I expect — a Uint8Array — and…
-
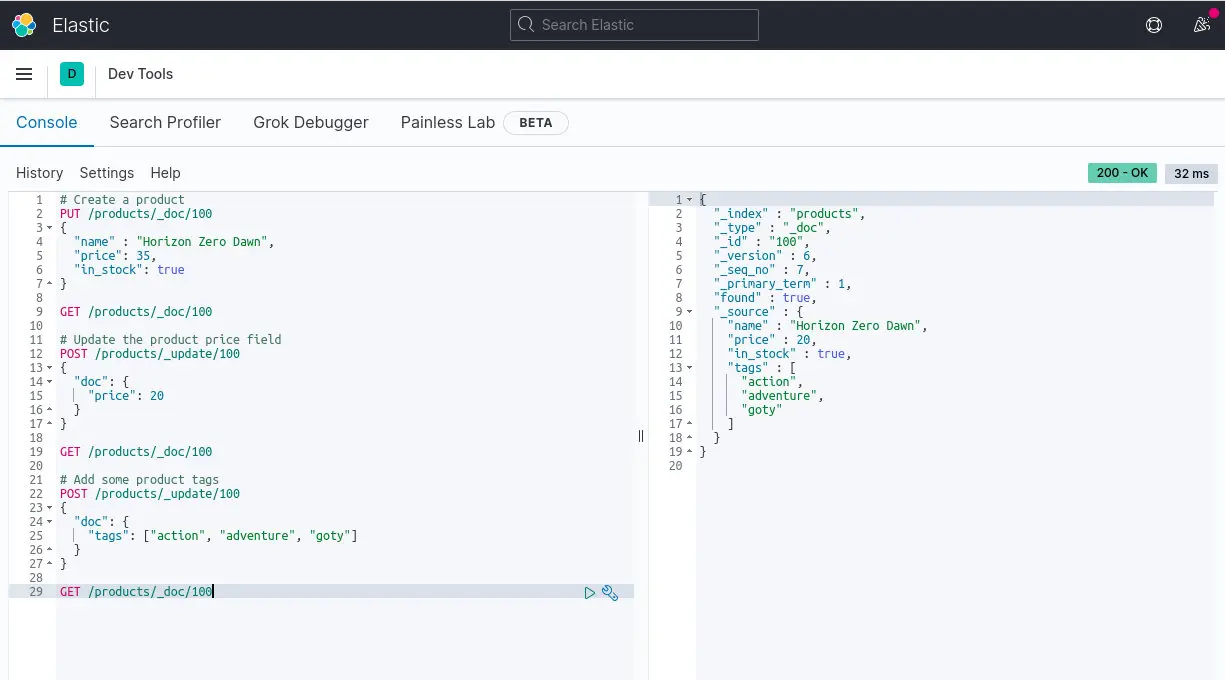
Setting up Elasticsearch and Kibana using Docker for local development
How to set up Kibana and Elasticsearch locally, within Docker containers.
-
Install MongoDB with Docker for local development
Pull the docker image for mongo down to your computer. docker pull mongo Run the mongo container in the background, isolated from the rest of your computer. # Command explained belowdocker run -d -p 27017:27017 –name mongodb mongo -v /data/db:/data/db What I love about this approach is that I don’t start muddying up my computer…
-
Setting up my own labs
I’m going to begin setting up my own “labs” area to play around with various web technologies. For the longest time now I have been holding myself back quite a bit by only really learning technologies around current roles at the time and for my own personal site. This has mainly revolved around Laravel and…
-
-
Bulk converting large PS4 screenshot png images into 1080p jpg’s
A niche example of how I bulk convert my screenshots to make them more website-friendly.
-
Updating PHP versions in Ubuntu 20.04
Installing an older PHP version and switching to it in Ubuntu.
-
Started to learn Rust
Today is the day when I start to learn the Rust programming language.