Tag: Docker

  • ๐Ÿ“‚

    Backing up Docker volume data to Digital Ocean spaces with encryption

    Backups are a must for pretty much anything digital. And automating those backups make life so much easier for you, should you lose your data.

    My use case

    My own use case is to backup the data on my home server, since these are storing my music collection and my family’s photos and documents.

    All of the services on my home server are installed with Docker, with all of the data in separate Docker Volumes. This means I should only need to back those folders that get mounted into the containers, since the services themselves could be easily re-deployed.

    I also want this data to be encrypted, since I will be keeping both an offline local copy, as well as storing a copy in a third party cloud provider (Digital Ocean spaces).

    Setting up s3cmd

    S3cmd is a command line utility for interacting with an S3-compliant storage system.

    It will enable me to send a copy of my data to my Digital Ocean Spaces account, encrypting it before hand.

    Install s3cmd

    The official installation instructions for s3cmd can be found on the Github repository.

    For Arch Linux I used:

    Bash
    sudo pacman -S s3cmd

    And for my home server, which is running Ubuntu Server, I installed it via Python’s package manager, “pip”:

    Bash
    sudo pip install s3cmd

    Configuring s3cmd

    Once installed, the first step is to run through the configuration steps with this command:

    Bash
    s3cmd --configure

    Then answer the questions that is asks you.

    You’ll need these items to complete the steps:

    • Access Key (for digital ocean api)
    • Secret Key (for digital ocean api)
    • S3 endpoint (e.g. lon1.digitaloceanspaces.com)
    • DNS-style (I use %(bucket)s.ams3.digitaloceanspaces.com)
    • Encryption password (remember this as you’ll need it for whenever you need to decrypt your data)

    The other options should be fine as their default values.

    Your configuration will be stored as a plain text file at ~/.s3cmd. This includes that encryption password.

    Automation script for backing up docker volume data

    Since all of the data I actually care about on my server will be in directories that get mounted into docker containers, I only need to compress and encrypt those directories for backing up.

    If ever I need to re-install my server I can just start all of the fresh docker containers, then move my latest backups to the correct path on the new server.

    Here is my bash script that will archive, compress and push my data to backup over to Digital Ocean spaces (encrypting it via GPG before sending it).

    I have added comments above each section to try and make it more clear as to what each step is doing:

    Bash
    #!/usr/bin/bash
    
    ## Root directory where all my backups are kept.
    basepath="/home/david/backups"
    
    ## Variables for use below.
    appname="nextcloud"
    volume_from="nextcloud-aio-nextcloud"
    container_path="/mnt/ncdata"
    
    ## Ensure the backup folder for the service exists.
    mkdir -p "$basepath"/"$appname"
    
    ## Get current timestamp for backup naming.
    datetime=$(date +"%Y-%m-%d-%H-%M-%S")
    
    ## Start a new ubuntu container, mounting all the volumes from my nextcloud container 
    ## (I use Nextcloud All in One, so my Nextcloud service is called "nextcloud-aio-nextcloud")
    ## Also mount the local "$basepath"/"$appname" to the ubuntu container's "/backups" path.
    ## Once the ubuntu container starts it will run the tar command, creating the tar archive from 
    ## the contents of the "$container_path", which is from the Nextcloud volume I mounted with 
    ## the --volumes-from flag.
    docker run \
    --rm \ 
    --volumes-from "$volume_from" \
    -v "$basepath"/"$appname":/backups \
    ubuntu \
    tar cvzf /backups/"$appname"-data-"$datetime".tar.gz "$container_path"
    
    ## Now I use the s3cmd command to move that newly-created 
    ## backup tar archive to my Digital Ocean spaces.
    s3cmd -e put \
      "$basepath"/"$appname"/"$appname"-data-"$datetime".tar.gz \
      s3://scottie/"$appname"/
    

    Automating the backup with a cronjob

    Cron jobs are a way to automate any tasks you want to on a Linux system.

    You can have fine-grained control over how often you want to run a task.

    Although work with Linux’s cron scheduler is out of the context of this guide, I will share the setting I have for my Nextcloud backup, and a brief explanation of its configuration.

    The command to edit what cron jobs are running on a Linux system, Ubuntu in my case, is:

    Bash
    crontab -e

    This will open up a temporary file to edit, which will get written to the actual cron file when saved — provided it is syntactically correct.

    This is the setting I have in mine for my Nextcloud backup (it should all be on a single line):

    Bash
    10 3 * * 1,4 /home/david/backup-nextcloud >> /home/david/backups/backup-nextcloud.log

    The numbers and asterisks are telling cron when the given command should run:

    Plaintext
    10th minute
    3rd Hour
    * Day of month (not relevant here)
    * Month (not relevant here)
    1st,4th Day of the Week (Monday and Thursday)

    So my configuration there says it will run the /home/david/backup-nextcloud command every Monday and Thursday at 3:10am. It will then pipe the command’s output into my log file for my Nextcloud backups.

    Decrypting your backups

    Download the file from your Digital Ocean spaces account.

    Go into the directory it is downloaded to and run the file command on the archive:

    Bash
    # For example
    file nextcloud-data-2023-11-17-03-10-01.tar.gz
    
    # You should get something like the following feedback:
    nextcloud-data-2023-11-17-03-10-01.tar.gz: GPG symmetrically encrypted data (AES256 cipher)

    You can decrypt the archive with the following command:

    Bash
    gpg --decrypt nextcloud-data-2023-11-17-03-10-01.tar.gz > nextcloud-backup.tar.gz

    When you are prompted for a passphrase, enter the one you set up when configuring the s3cmd command previously.

    You can now extract the archive and see your data:

    Bash
    tar -xzvf nextcloud-backup.tar.gz

    The archive will be extracted into the current directory.


  • ๐Ÿ“‚ ,

    Using docker and docker compose for my Homelab

    I’ve seen some very elaborate homelab set-ups online but wanted to get the easiest possible implementation I could, within my current skill set.

    As I have quite a lot of experience with using docker for development in my day to day work, I thought I’d just try using docker compose to setup my homelab service

    What is docker?

    Docker is a piece of software that allows you to package up your services / apps in to “containers”, along with any dependencies that they need to run.

    What this means for you, is that you can define all of the things you need to make your specific app work in a configuration file, called a Dockerfile. When the container is then built, it builds it with all of the dependencies that you specify.

    This is opposed to the older way of setting up a service / app /website, by installing the required dependencies manually on the host server itself.

    By setting up services using docker (and its companion tool docker compose) You remove the need to install manual dependencies yourself.

    Not only that, but if different services that you install require different versions of the same dependencies, containers keep those different versions separate.

    Installing the docker tools

    I use the guide for ubuntu on the official docker website.

    Once docker and docker compose are installed on the server, I can then use a single configuration file for each of the services I want to put into my Home Lab. This means I don’t need to worry about the dependencies that those services need to work — because they are in their own containers, they are self-contained and need nothing to be added to the host system.

    There are services that can help you manage docker too. But that was one step too far outside of my comfort zone for what I want to get working right now.

    I will, however, be installing a service called “Portainer”, detailed in my next Home Lab post, which gives you a UI in which to look at the docker services you have running.


  • ๐Ÿ“‚ ,

    Setting up mine, and my family’s, Homelab

    I’ve opted for what I believe is the easiest, and cheapest, method of setting up my Homelab.

    I’m using my old work PC which has the following spec:

    • Quad core processor — i7, I think.
    • 16gb of RAM
    • 440GB ssd storage (2x 220gb in an LVM setup)
    • A USB plug-in network adapter (really want to upgrade to an internal one though)

    My Homelab Goals

    My homelab goals are centered around two fundamental tenets: lower cost for online services and privacy.

    I want to be:

    • Hosting my own personal media backups: All my personal photos and videos I want stored in my own installation of Nextcloud. Along with those I want to also utilize its organizational apps too: calendar; todos; project planning; contacts.
    • Hosting my own music collection: despite hating everything Google stands for, I do enjoy using its Youtube Music service. However, I have many CDs (yes, CDs) in the loft and don’t like the idea of essentially renting access to music. Plus it would be nice to streaming music to offline smart speakers (i.e. not Alexa; Google Speaker; et al.)
    • Hosting old DVD films: I have lots of DVDs in the loft and would like to be able to watch them (without having to buy a new DVD player)
    • Learning more about networking: configuring my own network is enjoyable to me and is something I want to increase my knowledge in. Hosting my own services for my family and myself is a great way to do this.
    • Teach my Son how to own and control his own digital identity (he’s 7 months old): I want my Son to be armed with the knowledge of modern day digital existence and the privacy nightmares that engulf 95% of the web. And I want Him to have the knowledge and ability to be able to control his own data and identity, should He wish to when he’s older.

    Documenting my journey

    I will be documenting my Homelab journey as best as I can, and will tag all of these posts with the category of Homelab.


  • ๐Ÿ“‚ ,

    Starting a new Laravel 9 project

    Whenever I start a new Laravel project, whether that’s a little side-project idea or just having a play, I try to follow the same process.

    I recently read Steve’s post here on starting your first Laravel 9 Application, so thought I would write down my own setup.

    Whereas Steve’s guide walks you through the beginnings of building a new app, I’m only going to show what I do to get a new project in a ready state I’m happy with before beginning a build.

    This includes initial setup, static analysis, xdebug setup and CI pipeline setup (with Github Actions).


    Pre-requisites

    Before starting, I already have docker and docker-compose installed for my system (Arch Linux BTW).

    Oh and curl is installed, which is used for pulling the project down in the initial setup.

    Other than that, everything that is needed is contained within the Docker containers.

    I then use Laravel’s quick setup from their documentation.


    Initial setup

    Using Laravel’s magic endpoint here, we can get a new Laravel project setup with docker-compose support right out of the box. This could take a little time — especially the first time your run it, as it downloads all of the docker images needed for the local setup.

    curl -s https://laravel.build/my-new-site | bash

    At the end of the installation, it will ask you your password in order to finalise the last steps.

    Once finished, you should be able to start up your new local project with the following command:

    cd my-new-site
    
    ./vendor/bin/sail up -d

    If you now direct your browser to http://localhost , you should see the default Laravel landing page.


    Code style fixing with Laravel Pint

    Keeping a consistant coding style across a project is one of the most important aspects of development — especially within teams.

    Pint is Laravel’s in-house development library to enable the fixing of any deviations from a given style guide, and is actually included as a dev dependancy in new Laravel projects.

    Whether you accept it’s opinionated defaults or define your own rules in a “pint.json” file in the root of your project, is up to you.

    In order to run it, you simply run the following command:

    ./vendor/bin/sail bin pint

    A fresh installation of Laravel should give you no issues whatsoever.

    I advise you to make running this command often — especially before making new commits to your version control.


    Static Analysis with Larastan

    Static analysis is a great method for testing your code for things that would perhaps end up as run time errors in your code later down the line.

    It analyses your code without executing it, and warns of any bugs and breakages it finds. It’s clever stuff.

    Install Larastan with the following command:

    ./vendor/bin/sail composer require nunomaduro/larastan:^2.0 --dev

    Create a file called “phpstan.neon” in the root of your project with the following contents:

    includes:
        - ./vendor/nunomaduro/larastan/extension.neon
    
    parameters:
    
        paths:
            - app/
    
        # Level 9 is the highest level
        level: 5
    

    Then run the analyser with the following command:

    ./vendor/bin/sail bin phpstan analyse

    You can actually set the level in your phpstan.neon file to 9 and it will pass in a fresh Laravel application.

    The challenge is to keep it passing at level 9.


    Line by Line debugging with Xdebug

    At the time of writing, xdebug does come installed with the Laravel sail dockerfiles. However, the setup does need an extra step to make it work fully (at least in my experience)

    Aside:

    There are two parts to xdebug to think about and set up.

    Firstly is the server configuration — this is the installation of xdebug on the php server and setting the correct configuration in the xdebug.ini file.

    The second part is setting up your IDE / PDE to accept the messages that xdebug is sending from the server in order to display the debugging information in a meaningful way.

    I will show here what is needed to get the server correctly set up. However, you will need to look into how your chosen editor works to receive xdebug messages. VS Code has a plugin that is apparently easy to setup for this.

    I use Neovim, and will be sharing a guide soon for how to get debugging with xdebug working in Neovim soon.

    Enable Xdebug in Laravel Sail

    In order to “turn on” xdebug in Laravel Sail, we just need to enable it by way of an environment variable in the .env file.

    Inside your project’s .env file, put the following:

    SAIL_XDEBUG_MODE=develop,debug

    Unfortunately, in my own experience this hasn’t been enough to have xdebug working in my editor (Neovim). And looking around Stack Overflow et. al, I’m not the only one.

    However, what follows is how I get the xdebug server correctly configured for me to debug in Neovim. You will need to take an extra step or two for your editor of choice in order to receive those xdebug messages and have them displayed for you.

    Publish the Sail runtime files

    One thing Laravel does really well, is creating sensible defaults with the ease of overriding those defaults — and Sail is no different.

    Firstly, publish the Laravel sail files to your project root with the following command:

    ./vendor/bin/sail artisan sail:publish

    Create an xdebug ini file

    After publishing the sail stuff above, you will have a folder in the root of your project called “docker”. Within that folder you will have different folders for each of the supported PHP versions.

    I like to use the latest version, so I would create my xdebug ini file in the ./docker/8.2/ directory, at the time of writing.

    I name my file ext-xdebug.ini, and add the following contents to it. You may need extra lines added depending on your IDE’s setup requirements too.

    [xdebug]
    xdebug.start_with_request=yes
    xdebug.discover_client_host=true
    xdebug.max_nesting_level=256
    xdebug.client_port=9003
    xdebug.mode=debug
    xdebug.client_host=host.docker.internal

    Add a Dockerfile step to use the new xdebug ini file

    Within the Dockerfile located at ./docker/8.2/Dockerfile, find the lines near the bottom of the file that are copying files from the project into the container, and add another copy line below them as follows:

    COPY start-container /usr/local/bin/start-container
    COPY supervisord.conf /etc/supervisor/conf.d/supervisord.conf
    COPY php.ini /etc/php/8.2/cli/conf.d/99-sail.ini
    COPY ext-xdebug.ini /etc/php/8.2/cli/conf.d/ext-xdebug.ini

    Optionally rename the docker image

    It is recommended that you rename the image name within your project’s ./docker-compose.yml file, towards the top:

    laravel.test:
        build:
            context: ./docker/8.2
            dockerfile: Dockerfile
            args:
                WWWGROUP: '${WWWGROUP}'
        image: sail-8.2/app
        image: renamed-sail-8.2/app

    This is only if you have multiple Laravel projects using sail, as the default name will clash between projects.

    Rebuild the Image.

    Now we need to rebuild the image in order to get our new xdebug configuration file into our container.

    From the root of your project, run the following command to rebuild the container without using the existing cache.

    ./vendor/bin/sail build --no-cache

    Then bring the containers up again:

    ./vendor/bin/sail up -d

    Continuous Integration with Github Actions

    I use Github for storing a backup of my projects.

    I have recently started using Github’s actions to run a workflow for testing my code when I push it to the repository.

    In that workflow it first installs the code and it’s dependancies. It then creates an artifact tar file of that working codebase and uses it for the three subsequent workflows I run after, in parallel: Pint code fixing; Larastan Static Analysis and Feature & Unit Tests.

    The full ci workflow file I use is stored as a Github Gist. Copy the contents of that file into a file located in a ./.github/workflows/ directory. You can name the file itself whatever you’d like. A convention is to name it “ci.yml”.

    The Github Action yaml explained

    When to run the action

    Firstly I only want the workflow to run when pushing to any branch and when creating pull requests into the “main” branch.

    on:
      push:
        branches: [ "*" ]
      pull_request:
        branches: [ "main" ]

    Setting up the code to be used in multiple CI checks.

    I like to get the codebase into a testable state and reuse that state for all of my tests / checks.

    This enables me to not only keep each CI step separated from the others, but also means I can run them in parallel.

    setup:
        name: Setting up CI environment
        runs-on: ubuntu-latest
        steps:
        - uses: shivammathur/setup-php@15c43e89cdef867065b0213be354c2841860869e
          with:
            php-version: '8.1'
        - uses: actions/checkout@v3
        - name: Copy .env
          run: php -r "file_exists('.env') || copy('.env.example', '.env');"
        - name: Install Dependencies
          run: composer install -q --no-ansi --no-interaction --no-scripts --no-progress --prefer-dist
        - name: Generate key
          run: php artisan key:generate
        - name: Directory Permissions
          run: chmod -R 777 storage bootstrap/cache
        - name: Tar it up 
          run: tar -cvf setup.tar ./
        - name: Upload setup artifact
          uses: actions/upload-artifact@v3
          with:
            name: setup-artifact
            path: setup.tar
    

    This step creates an artifact tar file from the project that has been setup and had its dependancies installed.

    That tar file will then be called upon in the three following CI steps, extracted and used for each test / check.

    Running the CI steps in parallel

    Each of the CI steps I have defined — “pint”, “larastan” and “test-suite” — all require the “setup” step to have completed before running.

    pint:
        name: Pint Check
        runs-on: ubuntu-latest
        needs: setup
        steps:
        - name: Download Setup Artifact
          uses: actions/download-artifact@v3
          with:
            name: setup-artifact
        - name: Extraction
          run: tar -xvf setup.tar
        - name: Running Pint
          run: ./vendor/bin/pint

    This is because they all use the artifact that is created in that setup step. The artifact being the codebase with all dependancies in a testable state, ready to be extracted in each of the CI steps.

    pint:
        name: Pint Check
        runs-on: ubuntu-latest
        needs: setup
        steps:
        - name: Download Setup Artifact
          uses: actions/download-artifact@v3
          with:
            name: setup-artifact
        - name: Extraction
          run: tar -xvf setup.tar
        - name: Running Pint
          run: ./vendor/bin/pint

    Those three steps will be run in parallel as a default; there’s nothing we need to do there.

    Using the example gist file as is, should result in a full passing suite.


    Further Steps

    That is the end of my starting a new Laravel project from fresh, but there are other steps that will inevitably come later on — not least the Continuous Delivery (deployment) of the application when the time arrises.

    You could leverage the excellent Laravel Forge for your deployments — and I would actually recommend this approach.

    However, I do have a weird interest in Kubernetes at the moment and so will be putting together a tutorial for deploying your Laravel Application to Kubernetes in Digital Ocean. Keep an eye out for that guide — I will advertise that post on my Twitter page when it goes live.


  • ๐Ÿ“‚

    Sprinklings of Docker for local development

    When I search for docker-related topics online, it almost seems to me that there are two trains of thought for the most part:

    • Those who use a full docker / docker-compose setup for local development.
    • Those who hate and/or fear docker and would rather just install and do everything locally.

    I believe either of these is a valid approach — whatever feels right to you. Of course it does also depend on how your company / team works.

    But I’d like to introduce you to a third way of working on a project — sprinklings of docker, I call it ๐Ÿ˜€.

    The idea is essentially to just use docker for certain things in a project as you develop it locally.

    This is how I tend to work, but is by no means what I would call “the right way”; it’s just what works best for me.

    How I work with Docker.

    I am primarily a Laravel developer, and work as such at the excellent company — and Laravel PartnerJump 24.

    As I am a php developer, it stands to reason that I have php installed on my system. I also have nginx installed, so I can run a php application locally and serve it at a local domain without needing docker.

    Historically, when I would need a MySQL database (which is often the case) I would have gotten MySQL installed on my system.

    Which is fine.

    But I’m becoming a bit of a neat freak in my older age and so want to keep my computer as clean as possible within reason.

    So what I do now is start a new docker container for MySQL and connect to that instead:

    # Bash command to start up a docker container with MySQL in it
    # And use port 33061 on my local machine to connect to it.
    docker run \
    --name=mysql \
    --publish 33061:3306 \
    --env MYSQL_DATABASE=my_disposable_db \
    --env MYSQL_ROOT_PASSWORD=password \
    --detach mysql

    Then in my Laravel .env configuration I would add this:

    DB_HOST=0.0.0.0:33061
    DB_DATABASE=my_disposable_db
    DB_USERNAME=root
    DB_PASSWORD=password

    The benefit of working this way is that if anything happens to my MySQL container — any corruptions or just ending up with a whole mess of databases old and new in there, I can just destroy the container and start a new one afresh.

    Not to mention when I want to upgrade the MySQL version im working with… or even test with a lower version.

    docker container stop mysql
    docker container rm mysql
    # And then re-run the "docker run" command above.
    # Or even run it with different variables / ports.

    The same goes for any other database engines too: Postgres; Redis; MariaDB. Any can just be started up on your system as a standalone Docker container and connected to easily from your website / app in development.

    # Start a Postgres container
    docker run \
    --name postgres \
    --publish 5480:5432 \
    --env POSTGRES_PASSWORD=password \
    --detach postgres:11-alpine
    
    # Start a redis container
    docker run \
    --name redis \
    --publish 6379:6379 \
    --detach redis
    
    # Start a Mariadb container
    docker run \
    --name some-mariadb \
    --publish 33062:3306 \
    --env MARIADB_USER=example-user \
    --env MARIADB_PASSWORD=my_cool_secret \
    --env MARIADB_ROOT_PASSWORD=my-secret-pw  \
    --detach mariadb

    And with them all being self-contained and able to be exposed to any port on the host machine, you could have as many as you wanted running at the same time… if you were so inclined.

    I love how this approach keeps my computer clean of extra programs. And how it makes it super easy to have multiple versions of the same thing installed at the same time.

    Docker doesn’t have to be scary when taken in small doses. ๐Ÿ˜Š


  • ๐Ÿ“‚

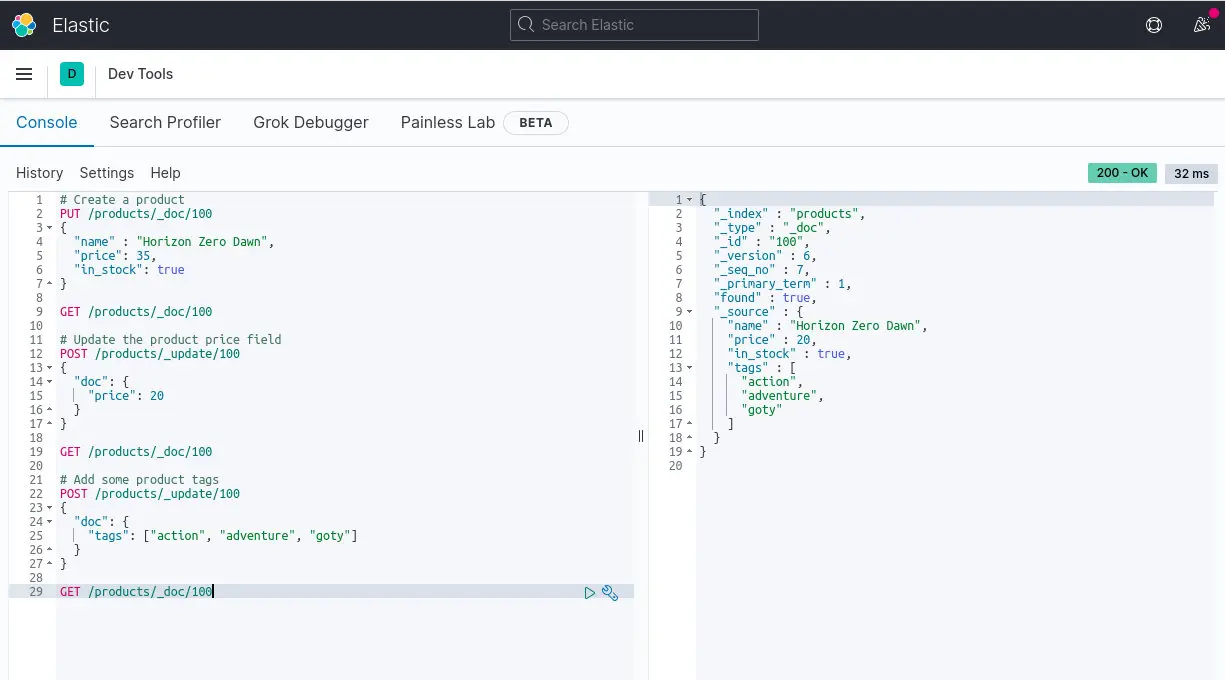
    Setting up Elasticsearch and Kibana using Docker for local development

    Overview

    Elasticsearch is a super-fast search query program. Kibana is a separate program that can be used for interacting with elasticsearch.

    Here I am setting up both Elasticsearch and Kibana in their own single Docker Containers. I do this as a way to help keep my computer relatively free from being cluttered with programs. Not only that, but since the containers are their own separate self-contained boxes, it also makes it easy to upgrade the Elasticsearch version I am using at a later date.

    Or even remove them entirely with minimal fuss.

    Please note: I am using version 7.10.1 of both programs in the examples below. You can look at each program’s respective docker hub pages to target the exact version you require:

    Just replace any uses of “7.10.1” below with your own version.

    Creating and running containers for the services needed

    Run the two following commands to download and run Elasticsearch locally:

    # Download the Elasticsearch docker image to your computer
    docker pull elasticsearch:7.10.1
    
    # Create a local container with Elasticsearch running
    docker run -d --name my_elasticsearch --net elasticnetwork -p 9200:9200 -p 9300:9300 -e "discovery.type=single-node" -e "xpack.ml.enabled=false" elasticsearch:7.10.1
    
    # Start the container
    docker container start my_elasticsearch

    And then run the two following commands to download and run Kibana locally:

    # Download the Kibana docker image to your computer
    docker pull kibana:7.10.1
    
    # Create a local container with Kibana running
    docker run -d --name my_kibana --net elasticnetwork -e ELASTICSEARCH_URL=http://elasticsearch:9200 -p 5601:5601 kibana:7.10.1
    
    # Start the container
    docker container start my_kibana

    Accessing Kibana

    Since kibana will be connecting to our Elasticsearch container, which it was told to use with the ELASTICSEARCH_URL=http://elasticsearch:9200 section of the Kibana create command, we really only need to use Kibana.

    Kibana has it’s own Devtools for querying Elasticsearch, which so far has been enough for my own usecases.

    head to http://localhost:5601 to access your own Kibana installation.

    Note: You can send curl requests directly to your Elasticsearch from the terminal by targeting the http://127.0.0.1:9200 endpoint.

    Deleting the containers

    If you wish to remove Elasticsearch and/or Kibana from your computer, then enter the following commands into your terminal.

    Using Docker for local development makes this a cinch.

    # Stop the Elasticsearch container if it is running
    # (Use it's name you gave it in the "--name" argument as its handle)
    docker container stop my_elasticsearch
    
    # Delete the Elasticsearch container
    docker container rm my_elasticsearch
    
    # Stop the Kibana container if it is running
    # (Use it's name you gave it in the "--name" argument as its handle)
    docker container stop my_kibana
    
    # Delete the Kibana container
    docker container rm my_kibana

    If you need to set up the two programs again, you can just use the create commands shown above to create them as you did originally.


  • ๐Ÿ“‚

    Install MongoDB with Docker for local development

    Pull the docker image for mongo down to your computer.

    docker pull mongo

    Run the mongo container in the background, isolated from the rest of your computer.

    # Command explained below
    docker run -d -p 27017:27017 --name mongodb mongo -v /data/db:/data/db

    What I love about this approach is that I don’t start muddying up my computer installing new programs — especially if it’s just for the purposes of experimenting with new technologies.

    The main run command explained:

    • “docker run -d” tells docker to run in detached mode, which means it will run in the background. Otherwise if we close that terminal it will stop execution of the program docker is running (mongo in this case).
    • “-p 27017:27017” maps your computer’s port number 27017 so it forwards its requests into the container using the same port. (I always forget which port represents the computer and which is the container)
    • “–name mongodb” just gives the container that will be created a nice name. Otherwise Docker will generate and random name.
    • “mongo” is just telling Docker which image to create.
    • “-v /data/db:/data/db” tells Docker to map the /data/db directory on your computer to the /data/db directory in the container. This will ensure that if you restart the container, you will retain the mongo db data.


  • ๐Ÿ“‚

    Docker braindump

    These are currently random notes and are not much help to anybody yet. They will get tidied as I add to the page.

    Docker Swarm

    Docker swarm secrets

    From inside a docker swarm manager node, there are two ways of creating a secret.

    Using a string value:

    printf <your_secret_value> | docker secret create your_secret_key -

    Using a file path:

    docker secret create your_secret_key ./your_secret_value.json

    Docker swarm secrets are saved, encrypted, and are accessible to containers via a filepath:

    /run/secrets/your_secret_key.

    Posts to digest

    https://www.bretfisher.com/docker-swarm-firewall-ports/

    https://www.bretfisher.com/docker/

    https://www.digitalocean.com/community/tutorials/how-to-set-up-laravel-nginx-and-mysql-with-docker-compose


  • ๐Ÿ“‚

    Been learning to use Docker Swarm

    After getting half-way through a Docker Mastery series on Udemy, I decided I would like to move my WordPress website, this one, to using a 3-node swarm.

    After a few days of editing and re-arranging my docker-compose.yml file (the local dev configuration file that can also be used for starting up a swarm since compose version 3.3) I have decided to just keep my website hosted on its single regular server. (Although I had already moved the database to its own dedicated server).

    Despite the fact that I haven’t actually managed to move over to using a swarm (and to be honest it isn’t even needed for me) I have managed to dive into a bunch of concepts around Docker and its Swarm component and feel that I have added a few new things to me dev toolkit.

    I think I will definitely be putting together a little demo in a swarm across three separate servers. But for now I will keep my website settled as it is. ๐Ÿ˜€

    What I have learned – or rather reminded myself of, whilst sat in at home during this damn isolation, is that it is important to keep looking into complimentary technologies around my everyday development skill set.


  • ๐Ÿ“‚

    How I would set up Laravel with Docker

    This is a quick brain dump for myself to remember how I set up Laravel with Docker. Hopefully it can help others out also.

    I tried to avoid Docker for the longest time due to the ease of just running php artisan serve. However, when you have some dependancies that your site will rely on, Docker can be helpful โ€” especially when having multiple developers โ€” in getting up and running with the whole codebase easier.

    This post assumes you have setup a basic Laravel project on a Linux computer, and have both Docker and Docker Compose installed locally.

    What will this project use?

    This is only a basic example to get up and running with the following dependancies. You can add more items to your docker-compose.yml file as you need to.

    Note: whatever you choose to name each extra service in your docker-compose.yml file, use its key as the reference point in your .env file.

    • The main site codebase
    • A MySQL database
    • an NGINX webserver
    • PHP

    docker-compose.yml

    Have a file in the project root, named `docker-compose.yml

    version: "3.3"
    
    services:
      mysql:
        image: mysql:8.0
        restart: on-failure
        env_file:
          - .env
        environment:
          MYSQL_ROOT_PASSWORD: ${MYSQL_ROOT_PASSWORD}
          MYSQL_DATABASE: ${MYSQL_DATABASE}
      nginx:
        image: nginx:1.15.3-alpine
        restart: on-failure
        volumes:
          - './public/:/usr/src/app'
          - './docker/nginx/default.conf:/etc/nginx/conf.d/default.conf:ro'
        ports:
          - 80:80
        env_file:
          - .env
        depends_on:
          - php
      php:
        build:
          context: .
          dockerfile: './docker/php/Dockerfile'
        restart: on-failure
        env_file:
          - .env
        user: ${LOCAL_USER}

    Dockerfile

    Have a Dockerfile located here: ./docker/php/Dockerfile. I keep it in a separate folder for tidiness.

    # ./docker/php/Dockerfile
    FROM php:7.2-fpm
    
    RUN docker-php-ext-install pdo_mysql
    
    RUN pecl install apcu-5.1.8
    RUN docker-php-ext-enable apcu
    
    RUN php -r "copy('https://getcomposer.org/installer', 'composer-setup.php');" \
        && php -r "if (hash_file('SHA384', 'composer-setup.php') === '48e3236262b34d30969dca3c37281b3b4bbe3221bda826ac6a9a62d6444cdb0dcd0615698a5cbe587c3f0fe57a54d8f5') { echo 'Installer verified'; } else { echo 'Installer corrupt'; unlink('composer-setup.php'); } echo PHP_EOL;" \
        && php composer-setup.php --filename=composer \
        && php -r "unlink('composer-setup.php');" \
        && mv composer /usr/local/bin/composer
    
    WORKDIR /usr/src/app
    
    COPY ./ /usr/src/app
    
    RUN PATH=$PATH:/usr/src/app/vendor/bin:bin
    

    default.conf

    Have a default.conf file for the project’s nginx container saved here: ./docker/nginx/default.conf

    # ./docker/nginx/default.conf
    server {
     server_name ~.*;
    
     location / {
         root /usr/src/app;
    
         try_files $uri /index.php$is_args$args;
     }
    
     location ~ ^/index\.php(/|$) {
         client_max_body_size 50m;
    
         fastcgi_pass php:9000;
         fastcgi_buffers 16 16k;
         fastcgi_buffer_size 32k;
         include fastcgi_params;
         fastcgi_param SCRIPT_FILENAME /usr/src/app/public/index.php;
     }
    
     error_log /dev/stderr debug;
     access_log /dev/stdout;
    }

    Add the necessary variables to your .env file

    There are some variables used in the docker-compose.yml file that need to be added to the .env file. These could be added directly, but this makes it more straightforward for other developers to customise their own setup.

    MYSQL_ROOT_PASSWORD=root
    MYSQL_DATABASE=example
    LOCAL_USER=1000:1000
    

    The MYSQL_ROOT_PASSWORD and MYSQL_DATABASE are self-explanatory, but theLOCAL_USER variable refers to the user id and group id of the currently logged in person on the host machine. This normally defaults to 1000 for both user and group.

    If your user and/or group ids happen to be different, just alter the variable value.

    Note: find out your own ids by opening your terminal and typing id followed by enter. You should see something like the following:

    uid=1000(david) gid=1000(david) groups=1000(david),4(adm),27(sudo),1001(rvm)

    uid and gid are the numbers you need, for user and group respectively.

    Run it

    Run the following two commands separately then once they are finished head to http:localhost to view the running code.

    Note: This setup uses port 80 so you may need to disable any local nginx / apache that may be running currently.

    docker-compose build
    docker-compose up -d

    Any mistakes or issues, just email me.

    Thanks for reading.